My previous article discussed how to setup a simple GraphQL server and query it from a Vue frontend. For my personal projects, I believe this is adequate, however a more common solution in complex, production applications is a framework to bring some structure and extra features to your stack. Apollo is one such framework.
To demonstrate how to use Apollo with Vue and Vuex, we will be building the following app:
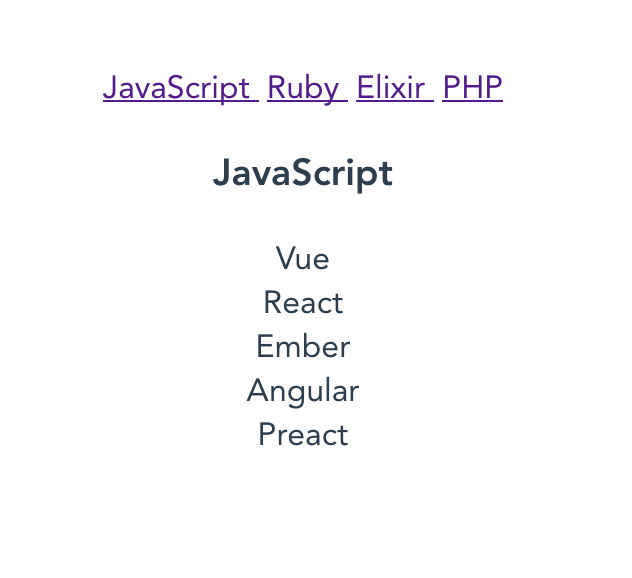
The app shows a list of programming languages, and fetches the frameworks for each when selected. I will be building both the GraphQL backend and Vue frontend, using Apollo on both the server and client.
The link to the source code for this project is here.
What is Apollo?
Apollo actual refers to a few things.
The Apollo Platform, or just Apollo for short: a family of technologies that you can incrementally add to your stack, including:
- Apollo Client: a client side framework to help manage GraphQL queries, their resulting data, and other related features such as caching
- Apollo Engine: Analytics and more for your Apollo-based applications
- Apollo Server: a server side framework for building GraphQL servers
If you are new to GraphQL, you should try without Apollo first. Frameworks are a great way to boost productivity, but I believe it is critical to understand the underlying infrastructure. Learning Apollo without at least a basic understanding of GraphQL would be like learning Vue or React without learning some HTML and JavaAScript first.
With that out of the way, let’s get started. I will cover the following topics:
- A simple backend using Apollo Server (and constrast it to a regular GraphQL backend)
- Use Apollo Client in a Vue app, to fetch and display data from the GraphQL backend
- How to integrate Apollo into existing apps using Vuex
- Look at some of the basic merits to using Apollo (primarily, caching)
One thing I will not be doing is using the VueApollo library. Apollo Client bills itself as having integration with all the popular frontends, but I think it’s good to see what it looks like without the integration. This makes the benefits of libraries like VueApollo more apparently when you use them.
Building the server
Let’s build a simple server. The server will show a bunch of programming languages, and let us view frameworks built with them in detail.
Installation:
We will be using the vue-cli to bootstrap a Vue app. Install that, and initialize a new project:
vue create apollo-vuex-graphqlcd in there, and install the server side packages.
npm install apollo-server-express body-parser cors express graphql-toolsThis is what each package does:
- apollo-server-express: Apollo Server + integration with express
- body-parser: so express can parse the request body
- cors: will let our Vue app query the backend from a different port
- graphql: dependency of apollo-server-express
- graphql-tools: some utilities to build GraphQL schemas, often used with Apollo Server. Maintained by the Apollo team.
Next, create a folder for the server called server, and create server/index.js. This is where the server will go. We also need some data, which I will save in server/database.js, so create that too, so create that too. Here is some nice mock data, which should be put in server/database.js.
class Language {
  constructor(id, name, frameworksById) {
    this.id = id
    this.name = name
    this.frameworksById = frameworksById
  }
}

class Framework {
  constructor(id, name) {
    this.id = id
    this.name = name
  }
}


const frameworks = [
  new Framework(1, 'Vue'),
  new Framework(2, 'React'),
  new Framework(3, 'Ember'),
  new Framework(4, 'Angular'),
  new Framework(5, 'Preact'),

  new Framework(6, 'Rails'),
  new Framework(7, 'Phoenix'),
  new Framework(8, 'Laravel'),
]

const languages = [
  new Language(1, 'JavaScript', [1, 2, 3, 4, 5]),
  new Language(2, 'Ruby', [6]),
  new Language(3, 'Elixir', [7]),
  new Language(4, 'PHP', [8]),
]

module.exports = {
  Language,
  Framework,
  languages,
  frameworks,
}
Great. Time to get started on the server. Open server/index.js and require the necessary packages:
// modules
const express = require('express')
const cors = require('cors')
const bodyParser = require('body-parser')
const { graphqlExpress, graphiqlExpress } = require('apollo-server-express')
const { makeExecutableSchema } = require('graphql-tools')

// the mock data and classes
const { Language, Framework, languages, frameworks } = require('./database')
Now we have required the necessary packages. Building the server involves:
- defining the queries and types, (called
typeDefsby Apollo) - implementing the queries (called
resolversby Apollo) - starting the app with some middleware and listening
Defining the type and queries
Queries and types are defined in the same structure, called typeDefs. Let’s start of with a single query, to make sure everything is working:
const typeDefs = `
  type Query {
    languages: [Language]
  }

  type Language {
    id: ID!
    name: String!
  }
`
This is usually done using buildSchema when using graphql.js, without Apollo.
Implementing the resolvers
We have to implement a resolver for the languages query. This is done in a resolvers object. If you have used graphql.js, this is the rootValue object.
const resolvers = {
  Query: {
    languages: () => languages
  }
}
We just return the languages array, which we required from database.js.
Create the schema
We use makeExecutableSchema from the graphql-tools module to pull everything together. This is graphqlHTTP in graphql.js, but can do a whole bunch of other things. We will just use the basic options.
const schema = makeExecutableSchema({
  typeDefs,
  resolvers,
})
Start the server
Now we just need to start the server. We use cors to let us make requets from another port (the Vue app will be running on port 8080). We also want to enable graphliql, so we can test queries easily.
const app = express()
app.use(cors())

// actual graphql endpoint
app.use('/graphql', bodyParser.json(), graphqlExpress({ schema }))

// use graphiql as well
app.use('/graphiql', graphiqlExpress({ endpointURL: 'graphql' }))

app.listen(5000, () => 'Listening on port 5000')
Now run node server. If you typed everything correctly, visiting localhost:5000/graphiql should show:
Try executing the query:
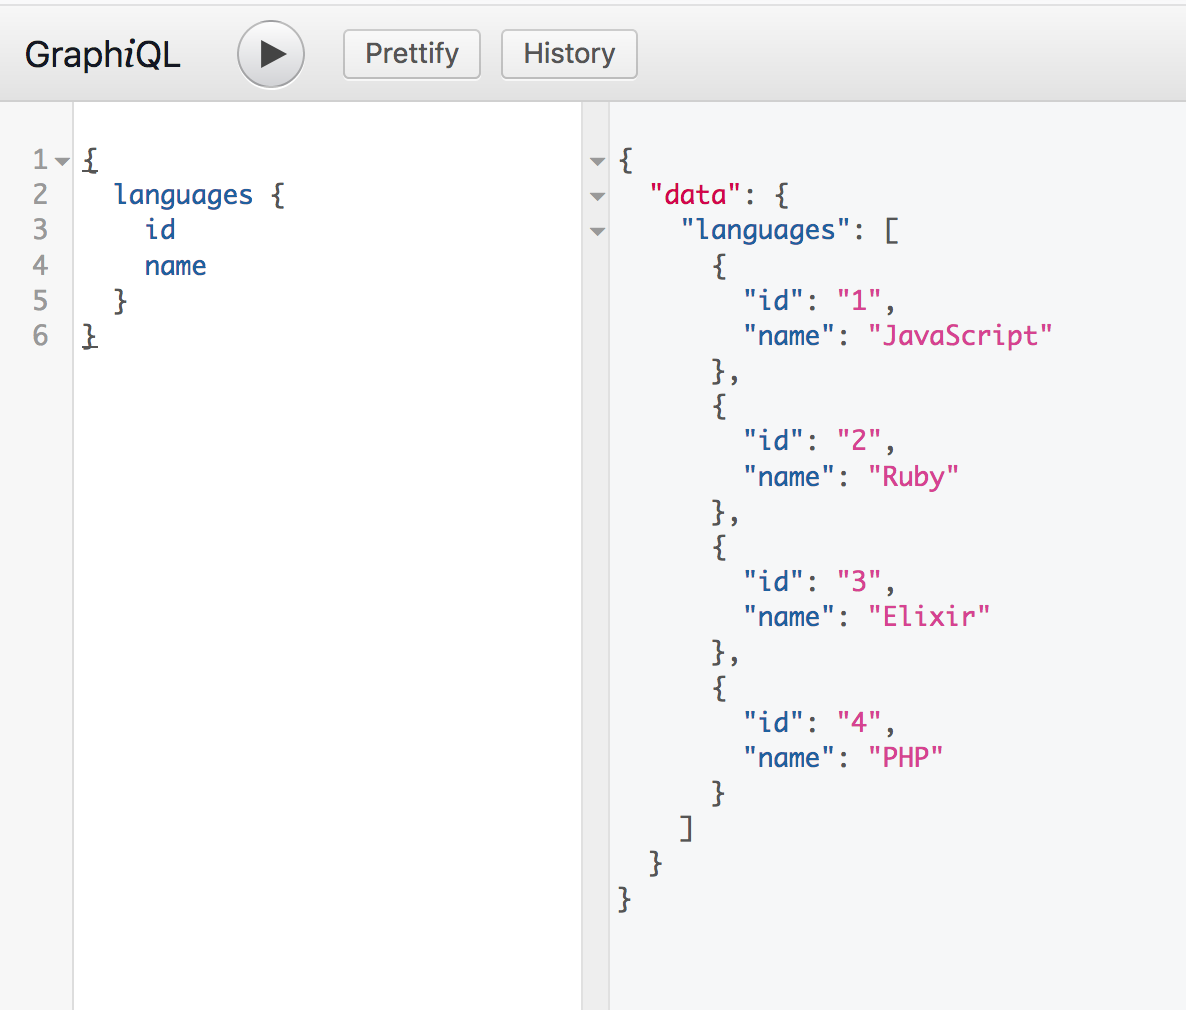
Okay, looking good. We will come back and implement two more queries, getLanguage(id) and getFramework(id) soon. First, let’s see how to access the data using Apollo Client.
Apollo Client
Apollo Client will let us easily query the server we just built. You can customize the Apollo Client in a number of ways. To let people get started quickly, the team provides a preconfigured client called apollo-boost. It includes a number of packages, such as:
- apollo-client: “Where all the magic happens”
- apollo-cache-inmemory: the recommended cache
- graphql-tag: a package to assist in writing and parseing GraphQL queries
Read the full details here.
We will also install Vue Router and Vuex, which we will be using. Install these packages by runnning:
npm install apollo-boost vuex vue-routerFirst, we need to create a new ApolloClient. Make a file inside src called apolloClient.js and add the following:
import ApolloClient from 'apollo-boost'

export default new ApolloClient({
  uri: 'http://localhost:5000/graphql'
})
There are many options you can provide, for now we are just telling ApolloClient which endpoint to query. For convinience, we will attach the ApolloClient instance to the Vue prototype. Head over to src/main.js, and add the following:
import Vue from 'vue'
import App from './App.vue'
import apollo from './apolloClient'

Vue.config.productionTip = false
Vue.prototype.$apollo = apollo

new Vue({
  render: h => h(App)
}).$mount('#app')
Now we can perform queries anywhere by running this.$apollo.query(...). Let’s try it out in src/App.vue:
// script section of App.vue
import gql from 'graphql-tag'

export default {
  name: 'app',

  async created() {
    const response = await this.$apollo.query({
      query: gql`
      query Languages {
        languages {
          id
          name
        }
      }`
    })
    console.log(response.data.languages)
  }
}
Next, we import graphql as gql. This makes writing GraphQL queries a bit nicer - see the syntax without gql in my previous article. We can now simply copy paste the test query from graphiql, and console.log the response.
Start the Vue app by running npm run serve and visit localhost:8080. If everything went well, you can open the console and see:

So everything is working - but we haven’t seen anything different or exciting yet. We could have achieved this without Apollo. Let’s take a look at what Apollo can do for us.
Caching requests
To see this in action, let’s add some delay to our server response intentionally. This will simulate a slow connection.
In server/index.js, add the following function:
const delay = () => new Promise(res => {
  setTimeout(() => {
    res(true)
  }, 1000)
})
Calling await delay() will cause the server to wait. Update resolvers to use delay:
const resolvers = {
  Query: {
    languages: async () => {
      await delay()
      return languages
    }
  }
}
It will be beneficial to see just how much time passes when getLanguages is called. Move the query from created to a method called getLanguages. We will also add a button that will manually trigger getLanguages. Update src/App.vue:
<template>
  <div id="app">
    <button @click="getLanguages">Get Languages</button>
  </div>
</template>

<script>
import gql from 'graphql-tag'

export default {
  name: 'app',

  async created() {
    await this.getLanguages()
  },

  methods: {
    async getLanguages() {
      console.time('getLanguages')
      const response = await this.$apollo.query({
        query: gql`
        query Languages {
          languages {
            id
            name
          }
        }`
      })
      console.log(response.data.languages)
      console.timeEnd('getLanguages')
    }
  }
}
</script>
The console should now output the time:
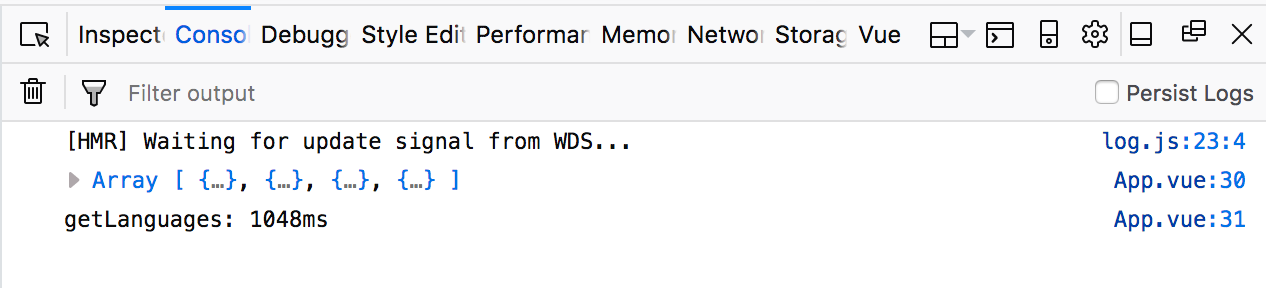
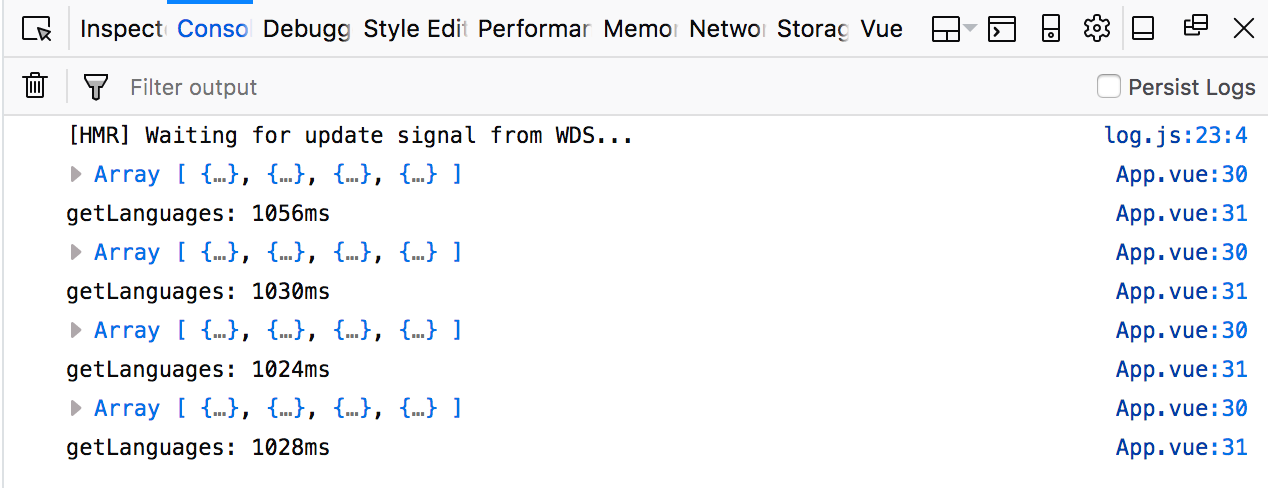
It took 1048ms. 1000ms was from delay. Try clicking the button a few more times. You should see:

Every call to getLanguages after the first completes in around 10ms - almost immediately. This is ApolloClient’s cache in action. Apollo remembers you executed getLanguages once already, and instead of making another request to the server, it responds with the previous result, that was cached.
Try adding this.$apollo.resetStore() after console.timeEnd(), and clicking the button a bunch more times.
resetStore clears Apollo’s store and cache, which is where the result of the queries executed are saved by default. Sinc we are clearing the store, Apollo is now executing the query and hitting the server each time you click the button.
resetStore can be useful in situations such as when a user logs out, and you want to clear all the data related to that user.
Another global store?
Now we have two ways to store data in large apps - Vuex/Redux, and Apollo’s cache optimized store. This brings up the question: Where does global state belong?
If you have been working with Vue or React, you are probably used to storing data in a Vuex or Redux store. Now we are introducing Apollo, we have two stores. You can view the Apollo store by doing:
console.log(this.$apollo.store)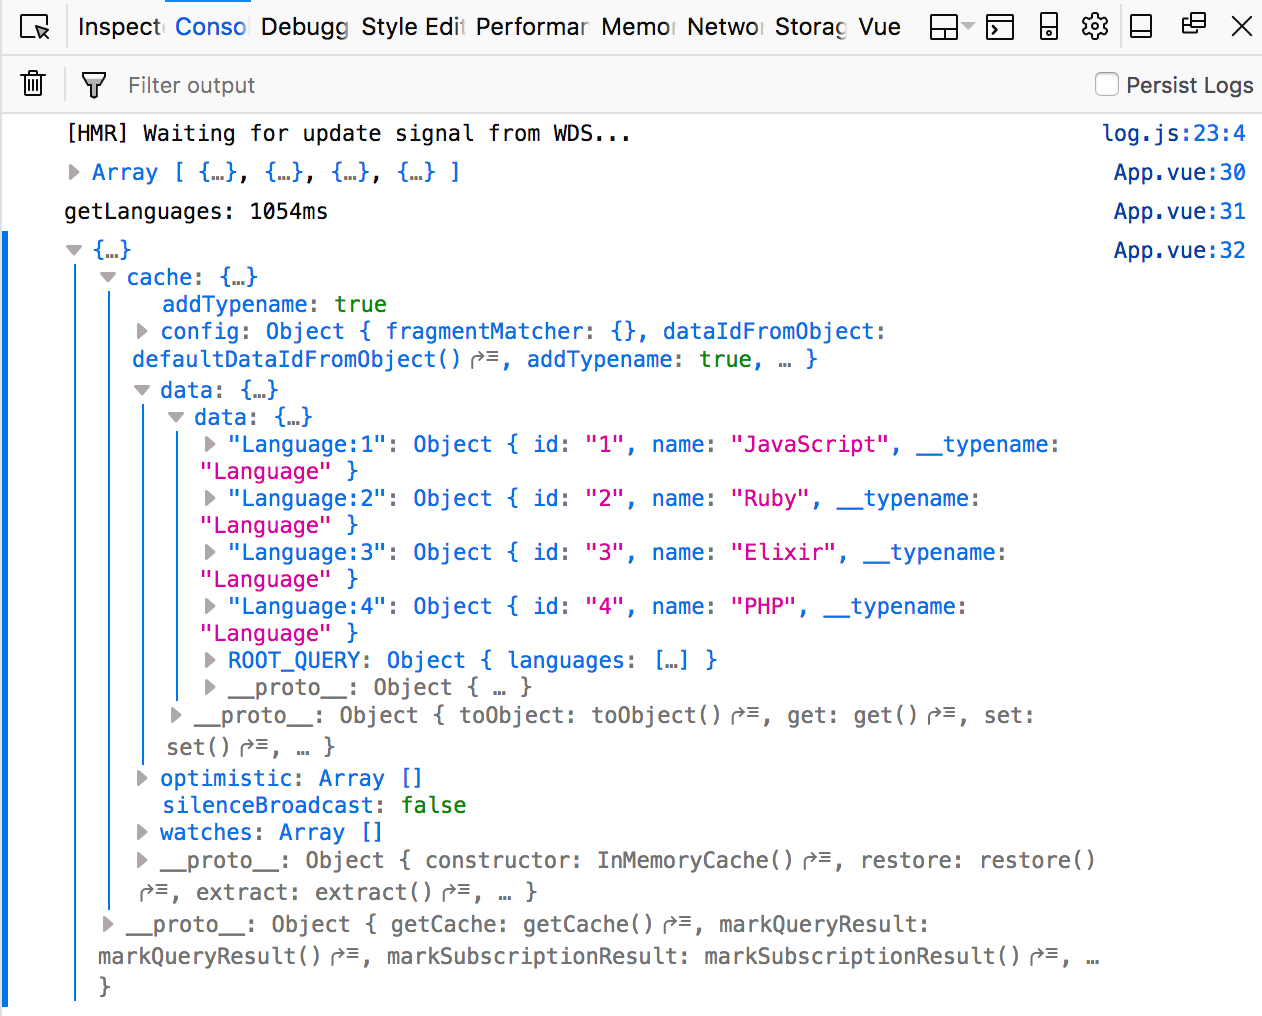
Interesting enough, Apollo’s store and cache are reactive, much like Vue and React’s reactivity. If a query or mutation modifies some data, all other references to it will be automatically updated in the Apollo store.
To connect the Apollo store to your frontend, and receive reactive updates to your UI, you can use React Apollo or VueApollo. VueApollo programmatically defines reactive properties using Vue’s reactivity system, based on the result of ApolloClient query and mutation results. ReactApollo likely does the same thing, and actually used Redux internally until version 2.
Basically, the client implementations provide some utilties to integrate Apollo’s cache/store with the UI framework’s reactivity system - a reactive, global store, sort of similar to Vuex and Redux. There is a library called Apollo link state, which lets you query the state, similar to what Vuex getters are used for.
I still like the Flux architecture lays out, and how clean the separation of data and UI becomes, as well as how easy it is to test mutations/reducers. I also like the benefits of Apollo (optimized GraphQL queries, automatically caching). Let’s try and establish a simple pattern, that will let you integrate Apollo into your existing Vue/Vuex apps gradually, without ditching your existing Vuex store. Then I will talk about how to can use Apollo entirely, as a replacement for a global state store.
Creating the Vuex store
Create a new file for the Vuex store: src/store.js, and add the following:
import Vue from 'vue'
import Vuex from 'vuex'
import gql from 'graphql-tag'
import apollo from './apolloClient'

Vue.use(Vuex)

const state = {
  languageIds: [],
  languages: {}
}

const mutations = {
  SET_LANGUAGES (state, { languages }) {
    const ids = languages.map(x => x.id)
    for (let id in ids) {
      if (!state.languageIds.includes(ids[id])) {
        state.languageIds.push(ids[id])
      }
    }

    for (let l in languages) {
      const language = languages[l]
      state.languages = {
        ...state.languages,
        [language.id]: {
          ...state.languages[language.id],
          ...language
        },
      }
    }
  },
}

const actions = {
  async getLanguages({ commit }) {
    console.time('getLanguages')

    const response = await apollo.query({
      query: gql`
      query Languages {
        languages {
          id
          name
        }
      }
      `
    })

    const { languages } = response.data
    commit('SET_LANGUAGES', { languages })

    console.timeEnd('getLanguages')
  }
}

export default new Vuex.Store({
  state, mutations, actions
})
This is pretty standard Vuex. We import apollo from ‘./apolloClient’, and just moved the query into an action. We also added mutation, SET_LANGUAGES, to add the data to the store’s state.
Adding Vue Router
We will also add Vue Router, which we will use soon. Create src/router.js, and inside add the following:
import Vue from 'vue'
import VueRouter from 'vue-router'
Vue.use(VueRouter)

export default new VueRouter({
})
We will add some routes soon. Import the router and store in src/main.js:
import Vue from 'vue'
import App from './App.vue'
import apollo from './apolloClient'
import store from './store'
import router from './router'

Vue.config.productionTip = false
Vue.prototype.$apollo = apollo

new Vue({
  store,
  router,
  render: h => h(App)
}).$mount('#app')
Lastly, update src/App.vue:
<template>
  <div id="app">
    <router-link
      v-for="id in $store.state.languageIds"
      :key="id"
      :to="id"
    >
      {{ $store.state.languages[id].name }}
    </router-link>

    <router-view></router-view>
  </div>
</template>

<script>

export default {
  name: 'app',

  async created() {
    await this.$store.dispatch('getLanguages')
  }
}
</script>
We are now rendering the languages in <router-link>, which currently go nowehere. We are also no longer writing the data fetching logic in the component. Now we can easily test the component by mocking the dispatch.
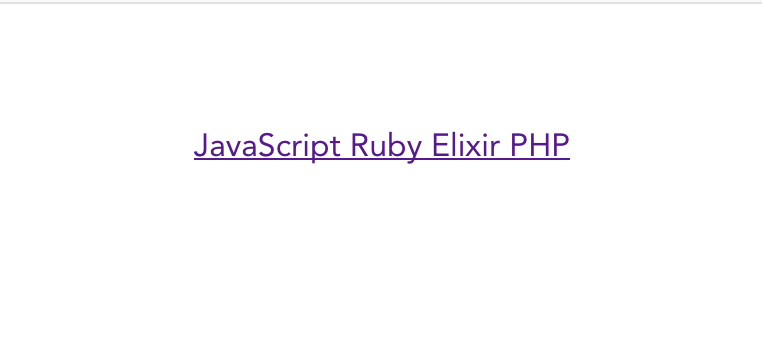
You should see this:
Now we get ApolloClient’s caching, with the usual Vuex flow. We are completely ignoring some of Apollo’s great features, like the reactive store, though. More on this later.
Adding a query with variables
Let’s add some more queries to the server, which will let us see Apollo in action a bit more. Update server/index.js:
const typeDefs = `
  type Query {
    languages: [Language]
    getLanguage(id: ID!): Language
  }

  // ...
}

const resolvers = {
  Query: {
    // ...
    getLanguage: async (_, { id }) => {
      await delay()
      return languages.find(x => x.id === parseInt(id))
    }
  }
}
You are probably wondering what the _ argument is. Read more here. It is the rootValue object from the graphql.js API - it is not used that often. There are actually a few more arguments received by resolvers:
obj- therootValueobjectdata- the data passed to the query. In our case,id, which we destructurecontext- the context object, which can be used to hold information like authentication and so forthinfo- I am not sure what this does, the documentation says it is only used in advanced cases
Let’s try the new query in graphiql:
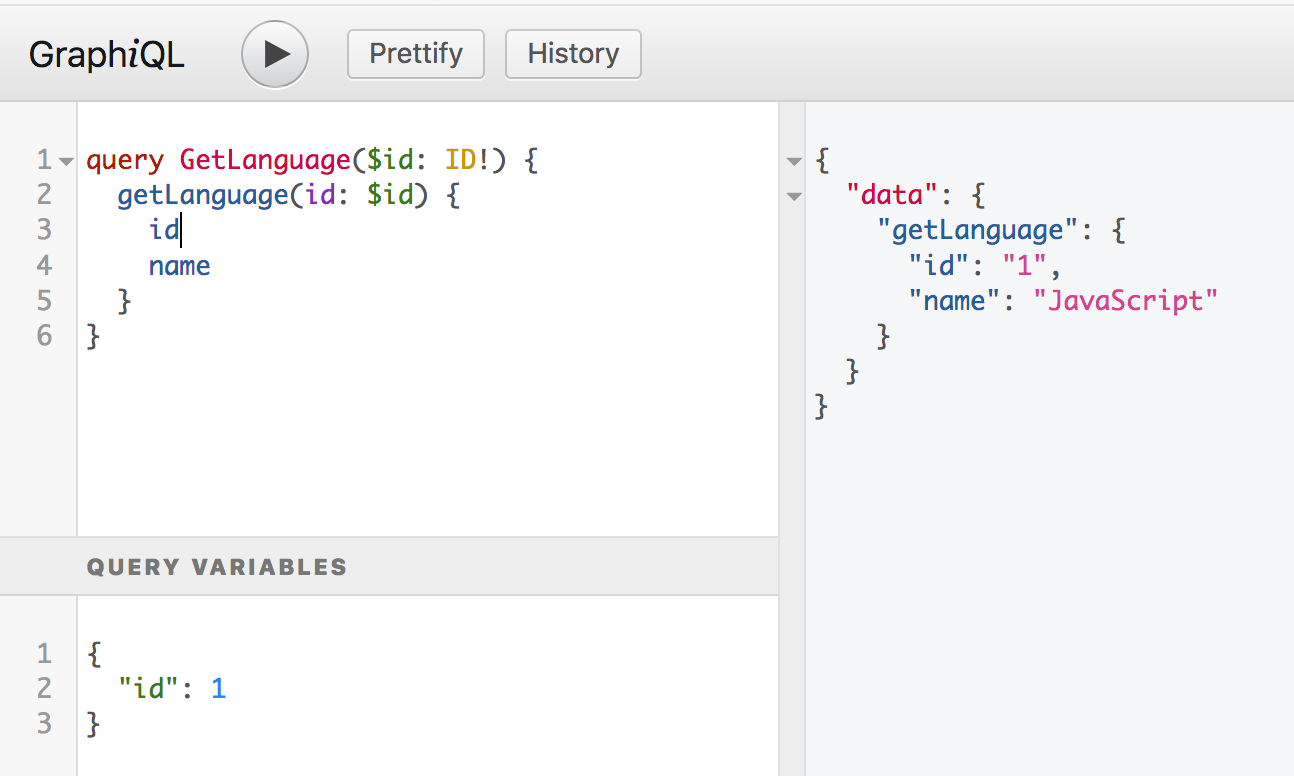
Finally, a Vuex action to fetch the data:
  async getLanguage({ commit }, id) {
    console.time(`getLangById ${id}`)

    const query = gql`
      query GetLanguage($id: ID!) {
        getLanguage(id: $id) {
          id
          name
        }
      }`

    const variables = {
      id: id
    }

    const response = await apollo.query({
      query, variables
    })

    commit('UPDATE_LANGUAGE', { id, data: response.data.getLanguage })

    console.log(response.data.getLanguage)
    console.timeEnd(`getLangById ${id}`)
  },
Make sure the variables object is defined outside the gql query. I was trying to include it in the gql tag and couldn’t figure out why it wouldn’t work. gql only parses queries, not variables.
Here is the matching mutation to save the result of getLanguage:
UPDATE_LANGUAGE(state, { id, data }) {
  if (!state.languageIds.includes(id)) {
    state.languageIds.push(id)
  }
  state.languages = {...state.languages, [id]: {...data}}
}
Adding another route component
To see this new query in action, we will add a <LanguageContainer> component, which will handle fetching the frameworks for each language. Create a <LanguageContainer> component in src: src/LanguageContainer.vue. Then enter the following:
<template>
  <div v-if="language">
    <h3>{{ language.name }}</h3>
  </div>
</template>

<script>
export default {
  name: 'LanguageContainer',

  computed: {
    language() {
      return this.$store.state.languages[this.$route.params.id]
    }
  },

  watch: {
    '$route.params.id': {
      handler (val) {
        this.$store.dispatch('getLanguage', val)
      },
      immediate: true
    }
  }
}
</script>
We will add the route in routes.js in a moment. We are using watch to dispatch the getLanguage action we made earlier. We can also add immediate: true to dispatch as soon as we visit the route, as well as each time it changes. The id will be taken from the $route, which was set up earlier when we wrote <router-link :to="lang.id> in src/App.vue. Go ahead and add LanguageContainer to src/routes.js:
import Vue from 'vue'
import VueRouter from 'vue-router'
import LanguageContainer from './LanguageContainer'
import App from './App'
Vue.use(VueRouter)

export default new VueRouter({
  routes: [
    {
      name: 'language-container',
      path: '/:id',
      component: LanguageContainer,
    }
  ]
})
Head back to the Vue app, and try clicking on JavaScript. You should be directed to localhost:8080/1, and you should see:
We fetche data using a query with variables! However, we don’t have the frameworks yet.
Improve the getLanguage query
Let’s update the Language class, and the getLanguage query. Starting with Language in server/database.js, we will add a new method, frameworks:
class Language {
  // ...

  frameworks() {
    return this.frameworksById.map(id => frameworks.find(y => y.id === id))
  }
}
frameworks will return a nice Array of Framework objects. Head over to server/index.js, and update typeDefs:
const typeDefs = `
  type Query {
    languages: [Language]
    getLanguage(id: ID!): Language
  }

  type Language {
    id: ID!
    name: String!
    frameworks: [Framework]
  }

  type Framework {
    id: ID!
    name: String
  }
`
We added frameworks: [Framework] to the Language type, and a Framework type. That’s it! Head over to localhost:5000/graphiql, and get ready to feel the power of GraphQL.
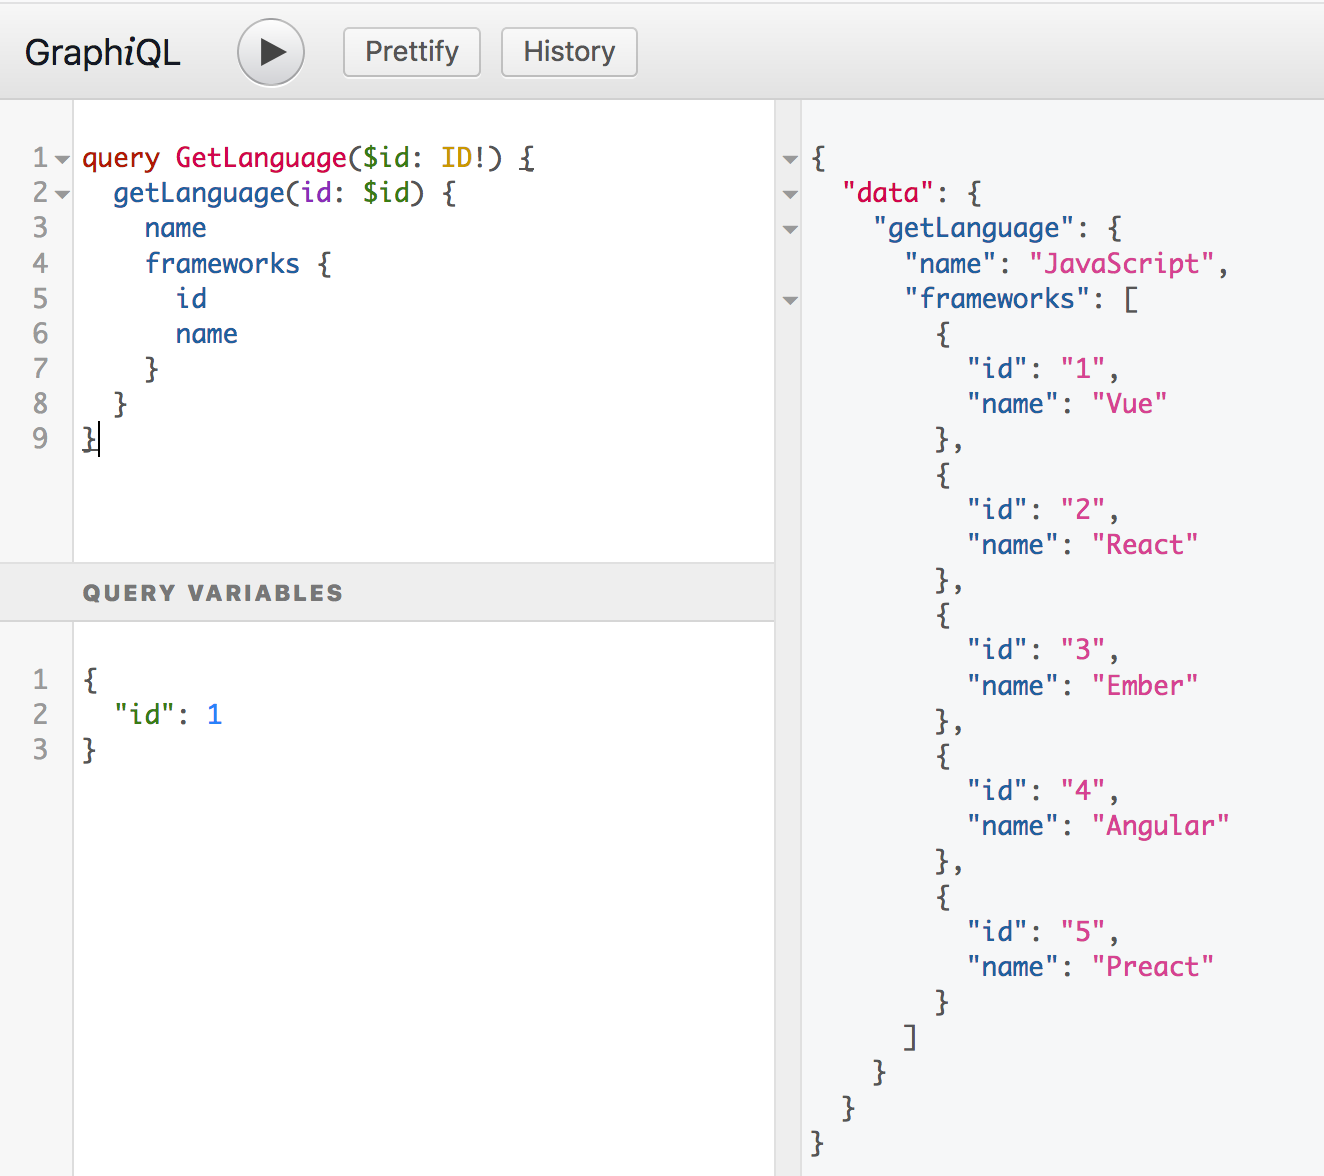
Looking good.
Showing frameworks on the client
Update getLanguage in src/store.js:
async getLanguage({ commit }, id) {
  // ...

  const query = gql`
    query GetLanguage($id: ID!) {
      getLanguage(id: $id) {
        id
        name
        frameworks {
          name
        }
      }
    }`

  // ..
}
We simply added the name of the field we want, frameworks, and the name property. The rest is left up to GraphQL + Apollo Server.
Let’s display the frameworks! Update <LanguageContainer>:
<template>
  <div v-if="language">
    <h3>{{ language.name }}</h3>
    <div
      v-for="framework in language.frameworks"
      :key="framework.id"
    >
      {{ framework.name }}
    </div>
  </div>
</template>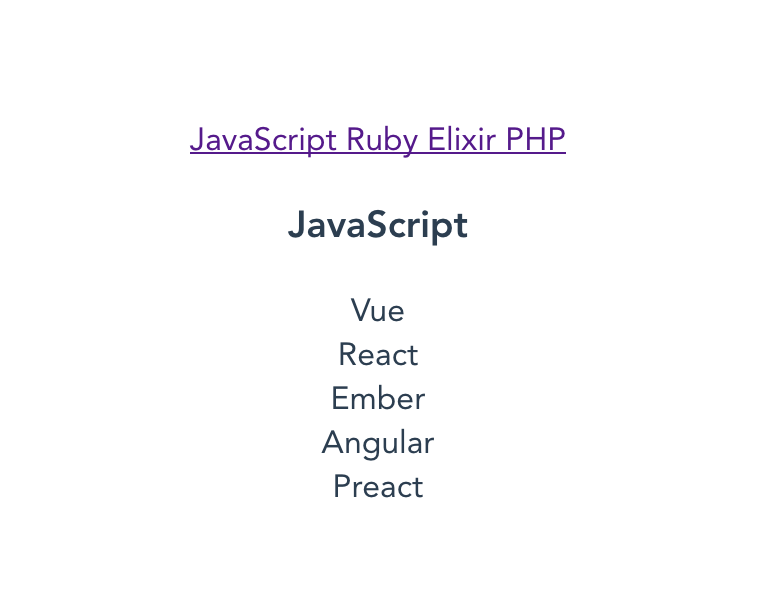
More on Apollo caching
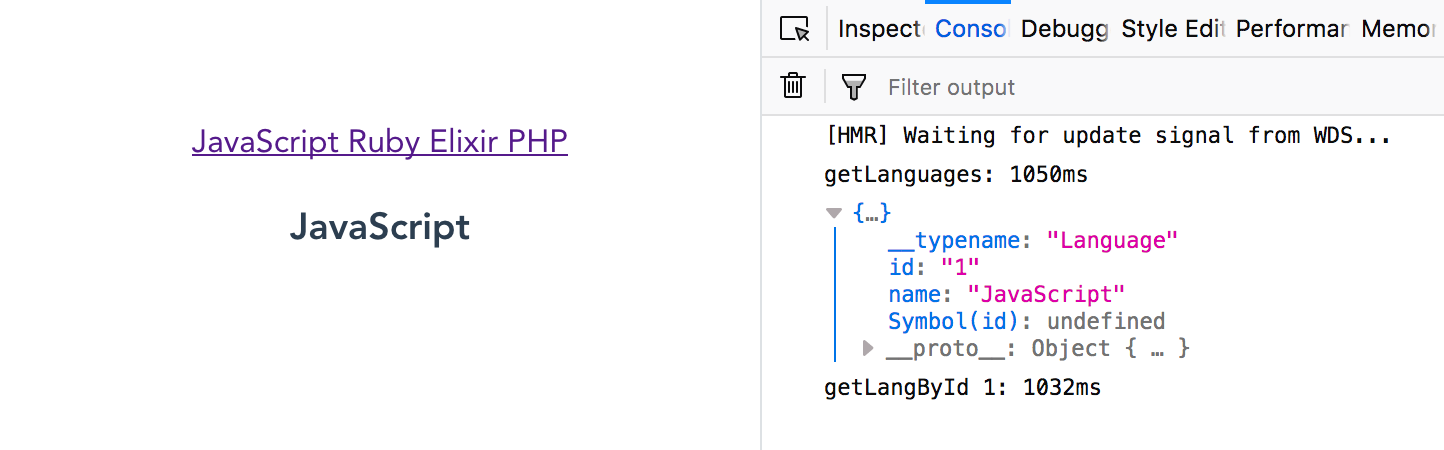
The above demonstrates Apollo’s smart caching again. Try clicking the link for a language. It should take a second to show the frameworks, due to the artificial delay we added. Try changing between languages - when you visit the link for a language you previously visited, the frameworks should display immediately. This is because Apollo cached the data, and instead of hitting the endpoint again, used the previous result.
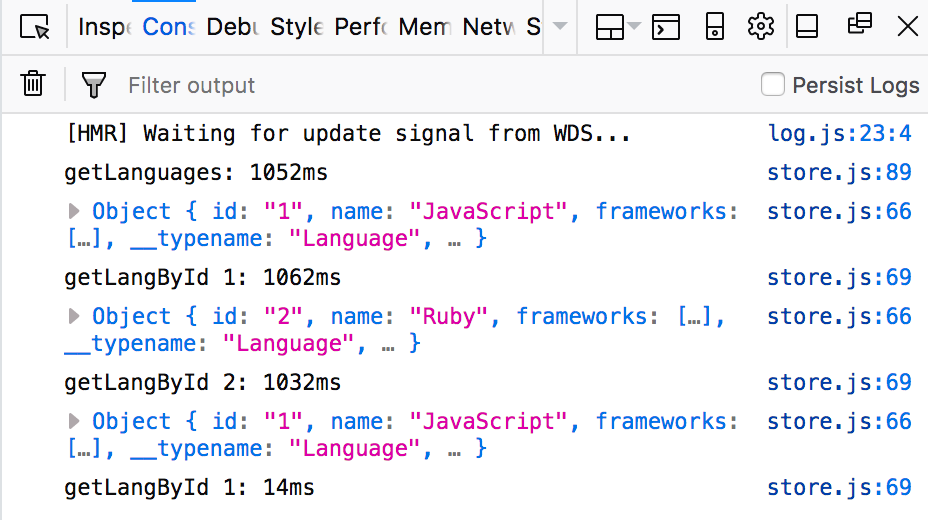
See how the first getLangById call took 1062ms, but the second only 14ms?
Thoughts on Vuex with Apollo
While we get Apollo’s convinient caching, we are ignoring a number of features, namely it’s own reative store, and how it normalizes data in the store, to optimize performance. We had to write the usual Vuex boilerplate action -> mutation.
There is an alternative. Apollo has a library called link state.
The idea of link state is to let Apollo automatically store the result of the queries, and instead of using something like Vuex modules to structure the data, and getters/computed properties to get the data you want from the store, you simply query the Apollo data store for what you want.
Basically, instead of thinking about how to structure you Vuex store, you simply let Apollo figure how out to structure the data. Then you simply write GraphQL queries (perhaps in methods, for example) and ask Apollo for whatever data you want.
While Apollo’s store is reactive internally, because Vue does not have knowledge of the Apollo store, you cannot simply use computed properties to watch the Apollo store. To integrate Apollo with Vue, you can use VueApollo. There is integration for most popular frameworks.
Now I have an understanding of how Apollo works, I would like to try out VueApollo soon. The idea of leaving the store to Apollo and simply querying for the data I want is appealing. I think that approach might be great for new applications, but if you want to slowly integrate Apollo to an existing app that is using Vuex, perhaps the way presented in this article is a good way to get started. It allows since you to take advantage of Apollo’s caching, and move from an existing (probably REST) API to a GraphQL API without changing you application’s structure significantly.
The link to the source code for this project is here.